WSUS – Windows Server Update Services
21 March 2020Introduction to Windows Server Update Services
Windows Server Update Services (WSUS) allows administrators to deploy the latest updates to Microsoft products. WSUS is a Windows Server server role and when you install it you can manage and deploy updates efficiently.
One of the most important tasks of system administrators is to keep client and server computers up to date with the latest software patches and security updates. Without WSUS, it would be really difficult to manage the deployment of updates.
Microsoft updates can be classified into the following categories:
- Critical Updates
- Security updates
- Definition updates
- Conductors
- Update patches
- Service Packs
- Tools
- Feature packs
- Updates
Required configuration
Before activating the WSUS server role, verify that the server meets the system requirements and verify that you have the necessary permissions to complete the installation by following these guidelines:
- The hardware requirements of the server to activate the WSUS role are related to the hardware requirements. The minimum hardware requirements for WSUS are as follows:
- Processor: x64 1.4 GHz (2 GHz or faster is recommended)
-
Memory: 2 GB more RAM than what is required by the server and all other services or software.
- Available disk space: 10 GB (40 GB or more is recommended)
- Network adapter: 100 Mbps or more
- Required software:
- To view the reports, WSUS requires the Microsoft Report Viewer Redistributable 2008.
- On Windows Server 2016, WSUS requires Microsoft Report Viewer Runtime 2012
- Microsoft .NET Framework 4.0 must be installed on the server where the WSUS server role will be installed.
WSUS firewall
When you configure the WSUS server, it is important that the server connects to Microsoft update to download the updates. If there is an enterprise firewall between WSUS and the Internet, you may need to configure this firewall to ensure that WSUS can get updates.
To obtain updates from Microsoft Update, the WSUS server uses port 443 for the HTTPS protocol. You must authorize WSUS Internet access to the following URL list:
- http://windowsupdate.microsoft.com
- http://*.windowsupdate.microsoft.com
- https://*.windowsupdate.microsoft.com
- http://*.update.microsoft.com
- https://*.update.microsoft.com
- http://*.windowsupdate.com
- http://download.windowsupdate.com
- https://download.microsoft.com
- http://*.download.windowsupdate.com
- http://wustat.windows.com
- http://ntservicepack.microsoft.com
- http://go.microsoft.com
- http://dl.delivery.mp.microsoft.com
- https://dl.delivery.mp.microsoft.com
Install the WSUS role
The steps to install the Windows Server Update Services (WSUS) role on Windows Server include:
- Log on to the Windows server where you plan to install the WSUS server role using an account that is a member of the Local Administrators group.
- In Server Manager, click Manage, then click Add Roles and Features.
- On the Before You Begin page, click Next.
- On the installation type selection page, select the installation option based on roles or functionalities. Click on Next.
- On the Server Selection page, verify the server name and click Next.
- On the Server Roles page, select the “Windows Server Update Services” role.
-
You should see the Add Features Required for Windows Server Update Services dialog box.
- Click Add Features, then click Next.
- On the Select Features page, leave the default options and click Next.
- On the Windows Server Update Services page, click Next.
WSUS database
-
WSUS on Windows Server supports the following databases:
- Windows Internal Database (WID)
- Microsoft SQL Server 2008 R2 SP1, 2012, 2014, 2016 in Enterprise / Standard / Express editions.
The default WID database is called SUSDB.mdf and is stored in the “% windir% \ wid \ data” folder. This database only supports Windows authentication (not SQL). The internal database instance (WID) for WSUS is called “server_name \ Microsoft ## WID”.
- Your organization does not have and does not plan to purchase licenses for SQL Server.
- WSUS load balancing (NLB WSUS) is not planned.
- If you plan to deploy a child WSUS server (for example, in branch offices). In this case, it is recommended to use the WSUS database integrated on the secondary servers.
The WSUS WID database can be administered via SQL Server Management Studio (SSMS), if you specify in the following connection string: “\\. \ Pipe \ MICROSOFT ## WID \ tsql \ query”.
Note that in free editions of SQL Server 2008/2012 Express, the maximum database size is limited to 10 GB. Most likely, this limit will not be reached (for example, the size of the WSUS database for 3000 customers is around 3 GB). The internal Windows database is limited to 524 GB.
If you install the WSUS role and the MS SQL database on different servers, there are some limitations:
- SQL Server with a WSUS database cannot be a domain controller.
- A WSUS server cannot host Remote Desktop Services at the same time.
If you plan to use the integrated WID database (this is a highly recommended and feasible option even for large infrastructures),
-
You must select the role services / database type to install for Windows Server Update services. Select WID Connectivity and WSUS Services. Click Next.
WSUS update location
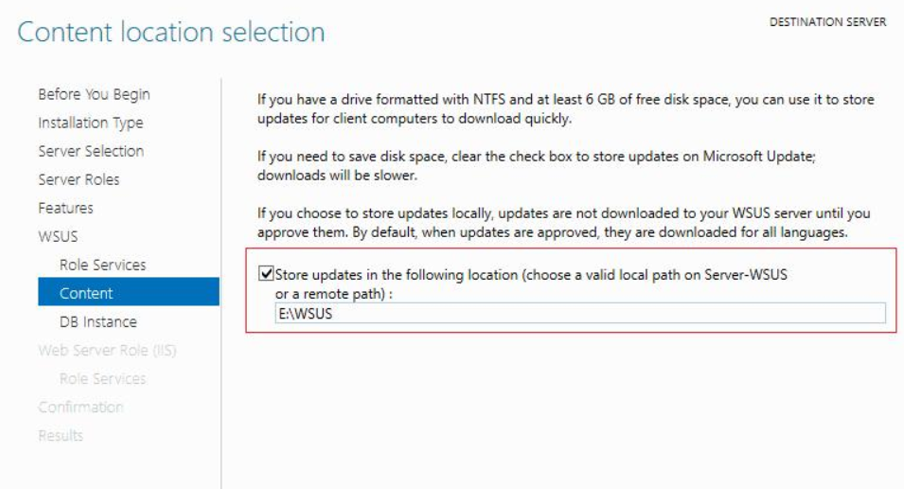
The size of this folder may possibly increase and you do not want this folder to reside on the C: drive.
Click on Next.
- On the Web Server Role (IIS) page, click Next.
- The role services to install the Web server (IIS) are selected automatically.
- Do not change anything here and click Next.
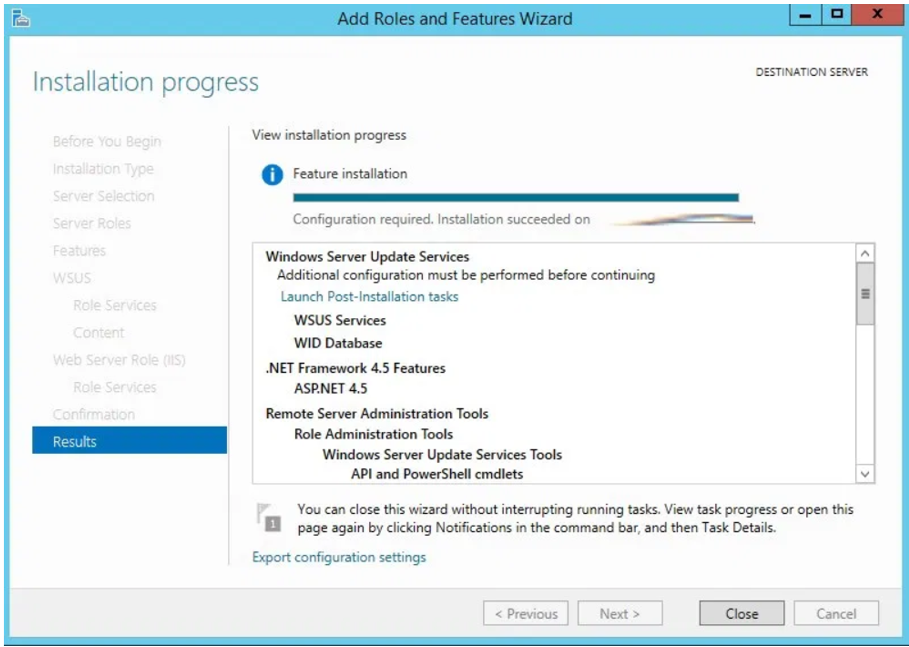
- Final confirmation before installing WSUS. Check the settings and click Install.
Configure Windows Server Update Services (WSUS)
After installing WSUS, you can configure the WSUS server using the WSUS Server Configuration Wizard. This is a unique configuration in which you will configure some important WSUS options.
If you don’t see a WSUS Server configuration wizard, or if you mistakenly skipped it, don’t worry. You can launch it by opening the WSUS console> Options> WSUS Server Configuration Wizard.
Before starting to configure WSUS, a few important points:
- Make sure the server firewall allows clients to access the WSUS server; if clients have problems connecting to the WSUS server, updates will not be downloaded from the server.
- The WSUS downloads updates from the upstream server which is the Microsoft update in our case, so make sure the firewall allows the WSUS server to connect to Microsoft Update.
-
In case there is a proxy server in your configuration, you need to enter the proxy server credentials when setting up WSUS, have them handy as they are required.
On the Before You Begin page, click Next.
WSUS upstream server
-
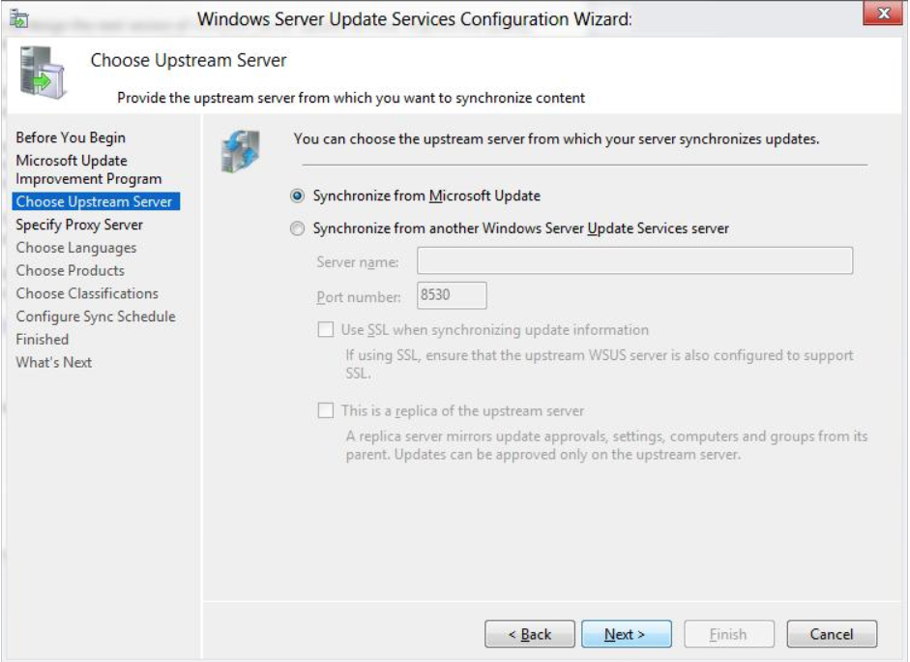
Synchronize from Microsoft Update – Select this option to download updates from Microsoft update.
- Synchronize from another Windows Server Update Services server – Select this option if you want this WSUS server to download updates from the existing WSUS server. You must specify the server name and port number (8530 ) by default. If you select the option to use SSL during synchronization of updates, make sure that the upstream WSUS server is also configured to support SSL.
Since this will be my only WSUS server, I will select Synchronize from Microsoft Update.
Click on Next.
Proxy server
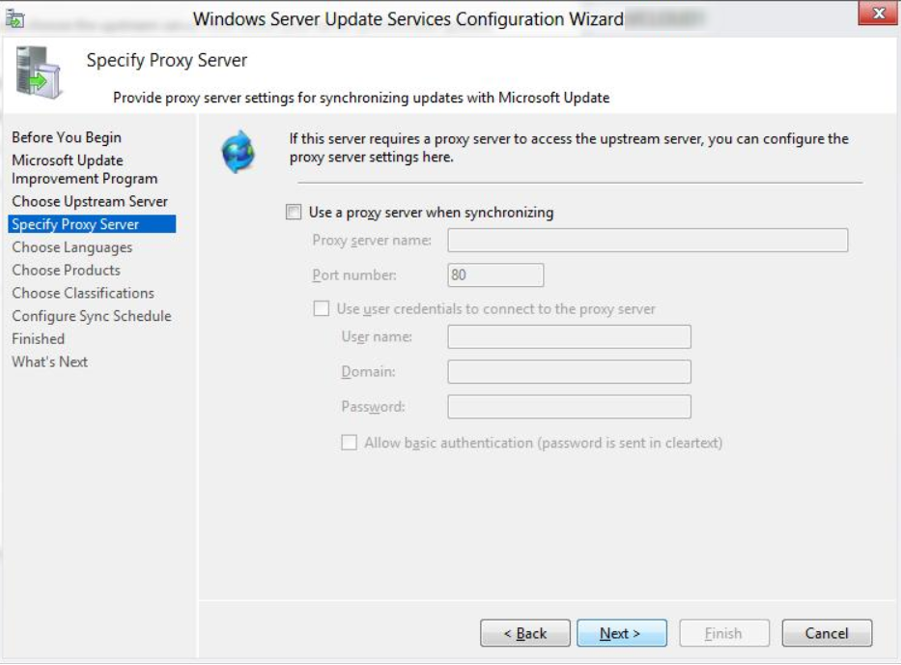
Specify the proxy server information if you have one.
If this option is selected, be sure to specify the proxy server name and port number. In addition to that, specify the credentials to connect to the proxy server. If you want to enable basic authentication for the user connecting to the proxy server, click Allow basic authentication (password in clear text).
Click on Next.
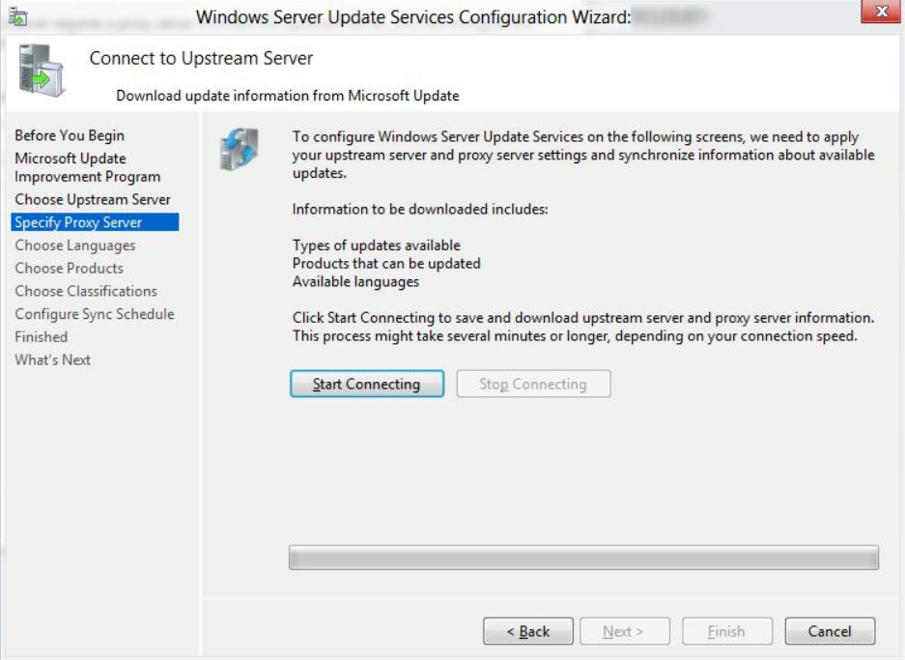
On the Connect to Upstream Server page, click the Start Connection button.
When finished, click Next.
Languages for updates
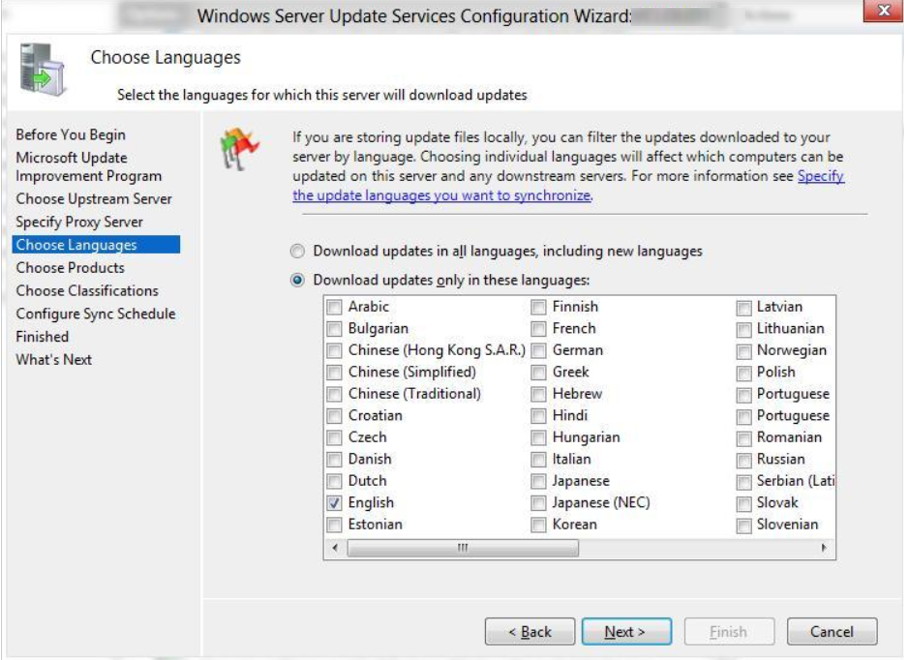
On the Choose Languages page, you have the option to select languages in updates.
If you choose to download updates in all languages, you will find updates with all languages in the WSUS console.
However, if you choose to get updates only for specific languages, select Download updates only for those languages. Select the languages for which you want updates.
Click on Next.
Products
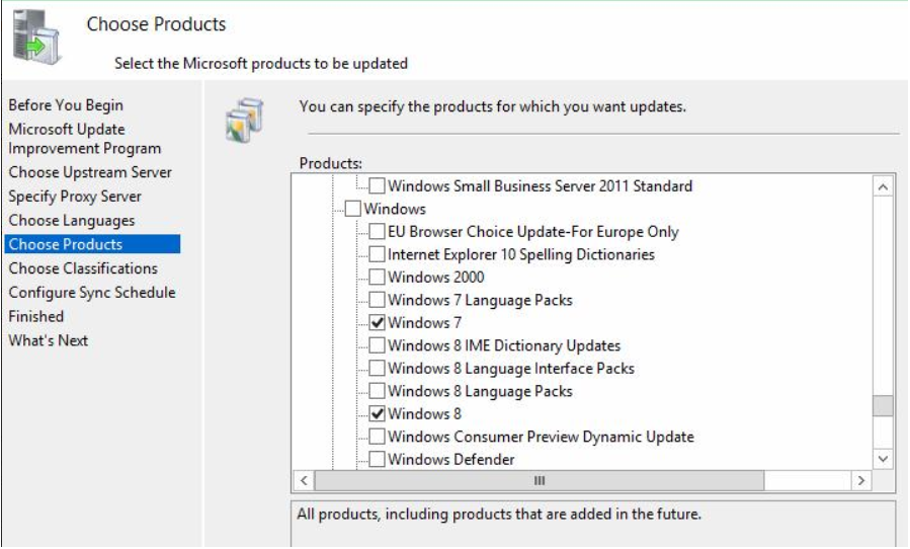
This is the page where you select the products for which you want updates.
A product is a specific edition of an operating system or application.
From the product list, you can select individual products or product families for which you want your server to synchronize updates. In this case, I will select Windows 7, Windows 8 & Windows 10 as products.
Click on Next.
Update classifications
At the start of the article, I listed the types of updates.
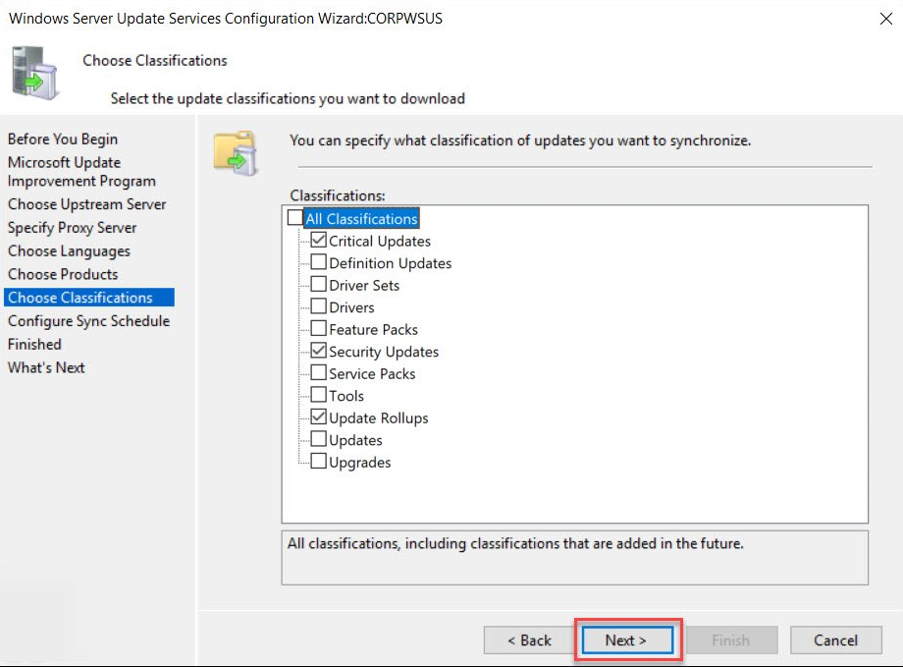
On the Choose Classifications page, select the required classifications.
I selected Critical Updates, Security Updates, and Cumulative Patches.
Click on Next.
Planning WSUS synchronization
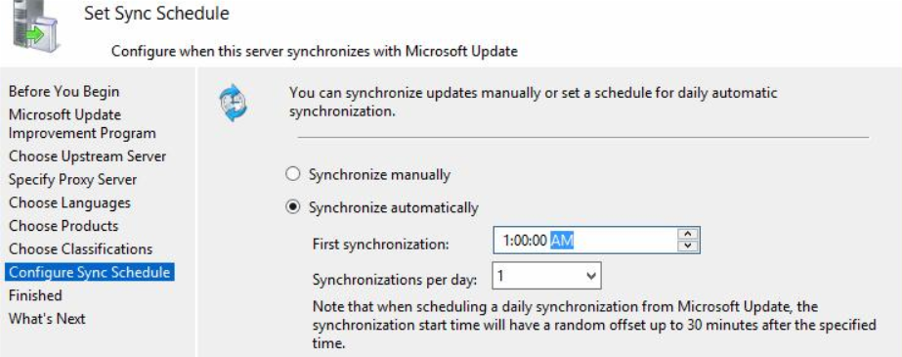
You must decide how you want to perform WSUS synchronization. The Set Synchronization Schedule page allows you to choose whether to synchronize manually or automatically.
If you choose Synchronize manually, you must manually start the synchronization process from the WSUS administration console. When this option is selected, you must manually synchronize each time. Therefore, do not select this option if you are setting up WSUS in production.
If you choose Synchronize automatically, the WSUS server will synchronize at defined intervals. You can set the time for the first synchronization. Then set the number of synchronizations per day. In the drop-down menu, you can choose the value between 1-24.
Click on Next.
Click Start initial synchronization. Click on Next.
Finally on the last page, click Finish. This completes the WSUS configuration steps.
Group Policy settings for WSUS
After installing and configuring WSUS, the next important task is to configure Group Policy settings for automatic updates. New clients still don’t know the new WSUS server that you just configured. Using Group Policy, you can point your client computers to a new WSUS server.
In an Active Directory environment, you can use Group Policy to specify the WSUS server. Group Policy settings will be used to get automatic updates from Windows Server Update Services (WSUS).
You can create Group Policy and apply it at the domain level. Or you can create and apply the Group Policy object to a specific organizational unit (containing your computers).
Configure WSUS Automatic Updates
To configure automatic update group policy settings for WSUS
- Open the Group Policy Management console and open an existing Group Policy object or create a new one.
- Go to Computer Configuration> Policies> Administrative Templates> Windows Components> Windows Update.
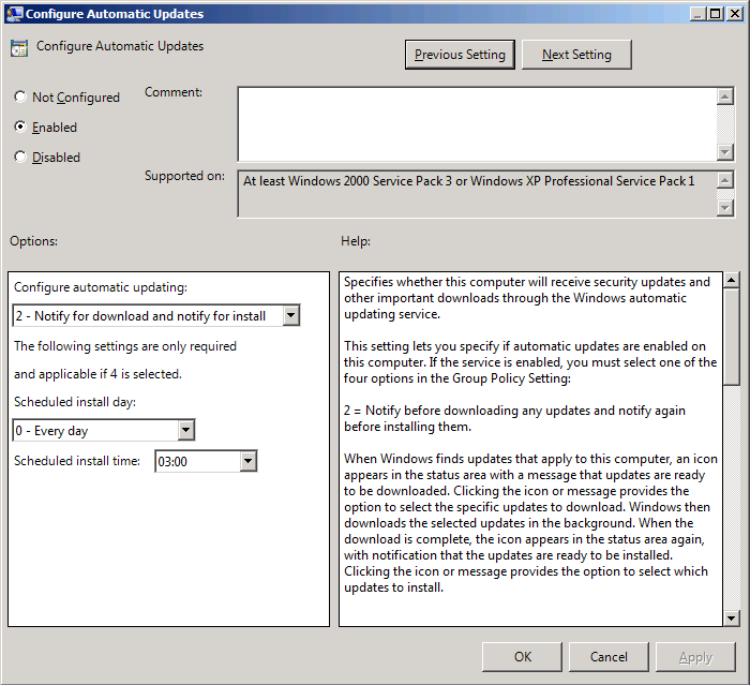
- Double-click Configure Automatic Updates and set it to Enabled.
If you select Automatic download and plan to install updates, you have a few options to limit the frequency of updates. If you have configured the settings, click Apply and OK.
Microsoft intranet update service location
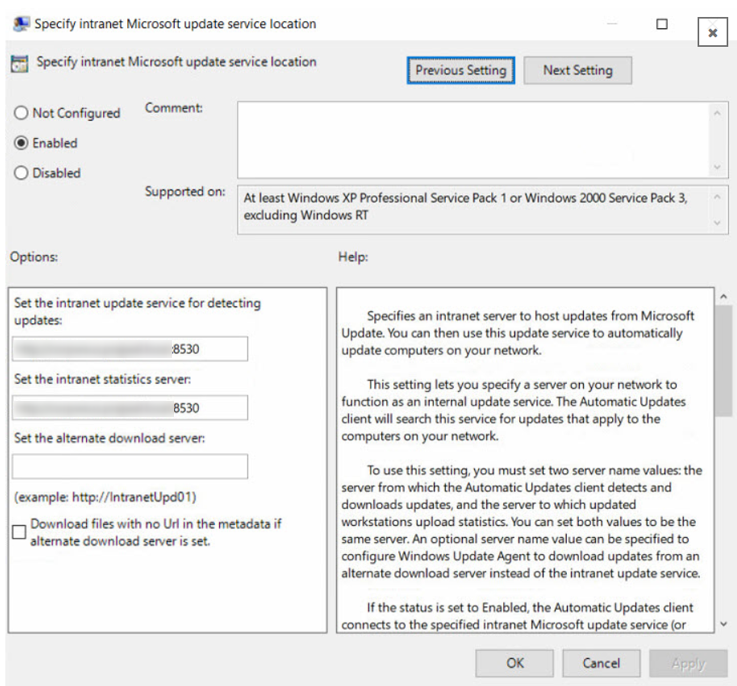
The next parameter that you must configure is to specify a Microsoft intranet update service location. The idea behind this is to make sure that client computers contact the specified intranet server instead of downloading updates from the Internet. If you do not configure this policy setting, client computers do not know the intranet server.
To activate the policy, click Activated. Specify the intranet update service and the intranet statistics server. Click Apply and OK.
WSUS computer groups
By creating groups of computers, you can first test and target updates to specific computers. When you open the WSUS console, you will find two default computer groups: all computers and unassigned computers.
ou can create custom computer groups to manage updates in your organization. According to Microsoft, you must create at least one group of computers in the WSUS console. Test the updates before deploying them to other computers in your organization.
To create a new group of computers in the WSUS console:
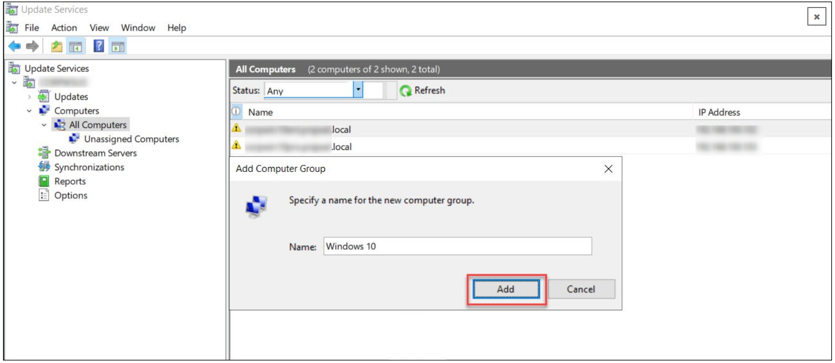
In the WSUS administration console, under Update Services, expand the WSUS server. Expand the computers, right-click All Computers, and then click Add Computer Group.
In the Add Computer Group dialog box, specify the name of the new group, and then click Add.
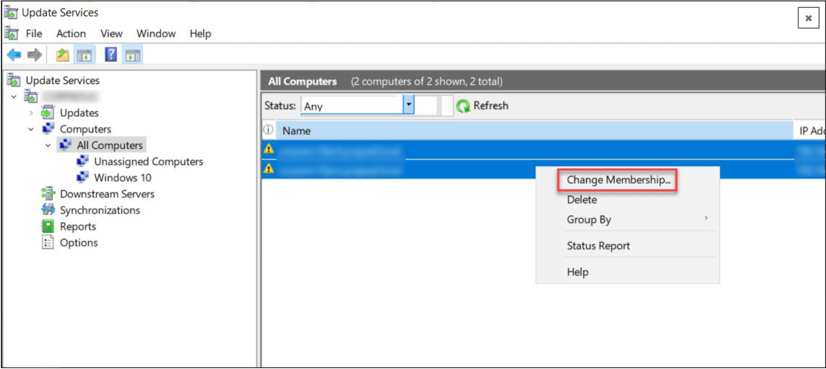
Click All Computers and you should see the list of computers. Select the computers, right click and click on Change Membership.
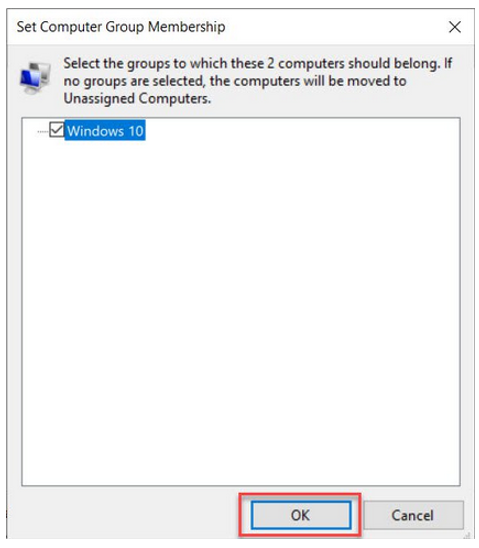
In the Define computer group membership area, select the new group you just created. Click on OK.
Click on the new group and you should find these computers.
Approve and deploy updates in WSUS
After you have created a group of test computers, your next task is to deploy the updates to the test group. To do this, you must first approve and deploy the WSUS updates.
To approve updates in WSUS:
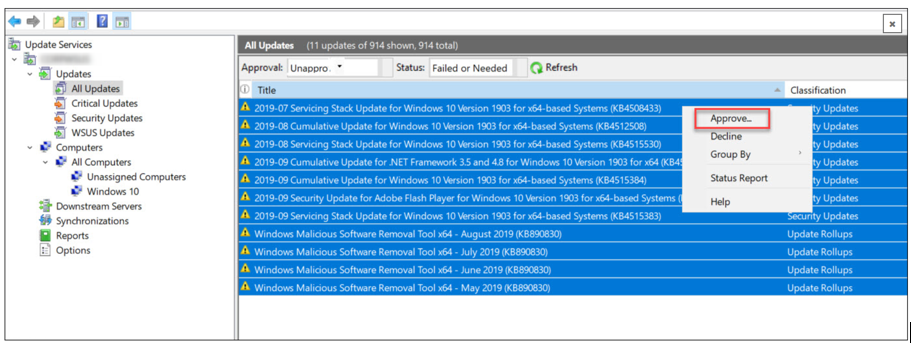
- Launch the WSUS administration console, click Updates> All Updates.
- In the All Updates section, select the updates that you want to approve for installation in your group of test computers.
- Right-click the updates and click Approve.
Especially in the Approve Updates dialog box, select your test group, then click the down arrow. Click Approved for installation. You can also set a deadline for installing updates. Click on OK.
The Approval Progress window appears, which shows the progress of the tasks that affect the approval of the update. When the approval process is complete, click Close.
Configure automatic approval rules in WSUS
If you do not want to manually approve updates, you can configure the automatic approval rule in Windows Server Update Services.
To configure automatic approvals in WSUS:
-
Launch the WSUS administration console, expand the WSUS server, and click Options.
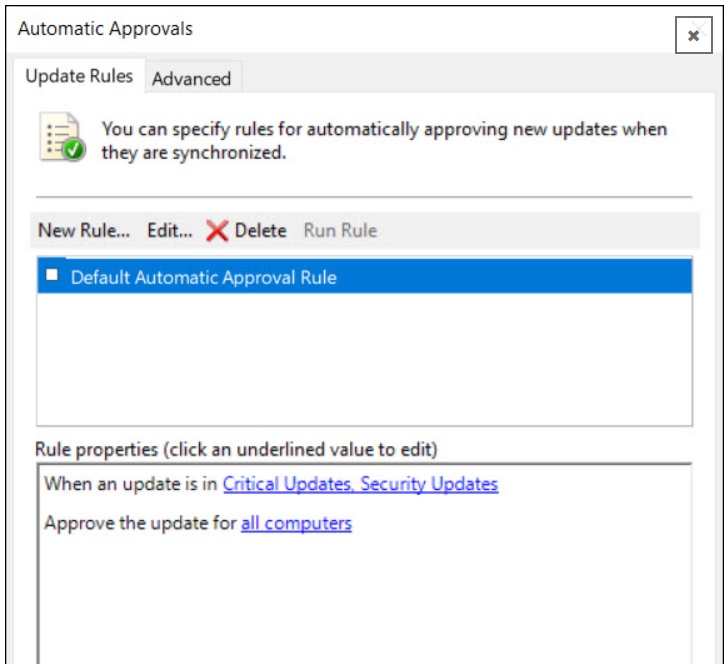
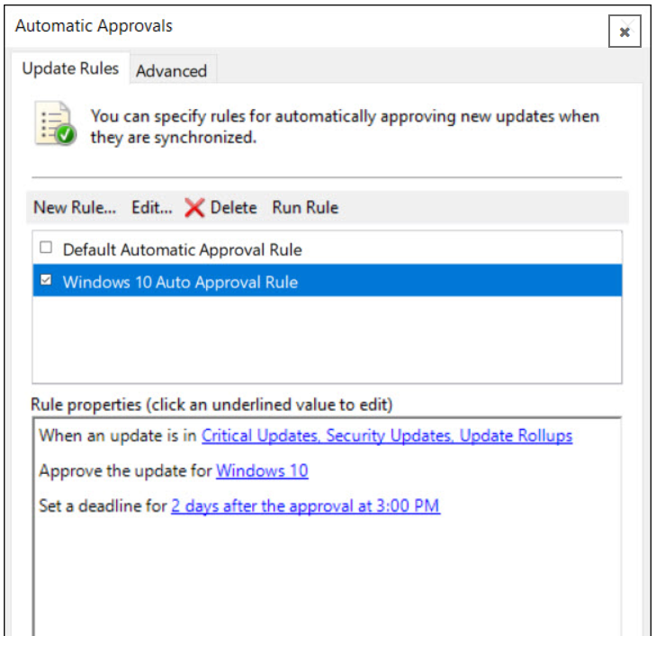
- In Options, click Automatic Approvals.
- You should find the default automatic approval rule and if you want, you can modify and use it.
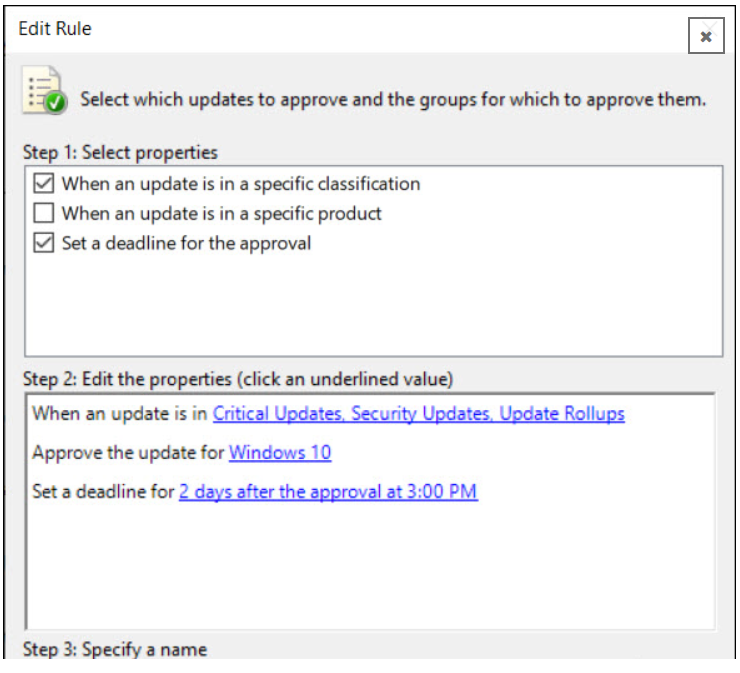
- To create a new approval rule, click New Rule.
Check the box When an update is in a specific classification. Select the classifications. You can also approve the update for groups of computers. I’m going to select Windows 10 because it’s my group of test computers. Finally, you can set a deadline for approval of the update and specify the name of the automatic approval rule.
After configuring the rule, click OK.
In the Automatic Approvals window, you can find the rule you just created. If you want to run this rule, click Run Rule.
This completes the steps to install and configure WSUS.
Visits: 7310

